A Perfect Guide to Help Beginners to Build APIs
Written by Hemendra Singh on May 22, 2018 | Updated on: May 22, 2018

In today’s time, a mobile application is expected to provide an excellent user experience to their users. Building an app with proper coding, UI/UX is not sufficient to fulfil the complete operation of your mobile application. It is important to know how efficiently your app interacts with a web service, backend or APIs.
APIs ensures that all the users are remotely served with data resources and apps. The APIs can be enabled to you through Google, Facebook, Amazon or any other third-party. To help you know, what is an API, how is API is build and what resources are required to develop a good API, we have created this article. Read through and learn more.
Table of Contents
What is an API?
API is the acro NYm for Application Program Interface. In simple terms, API creates an environment that allows one piece of software to talk to another software. It is basically a series of HTTP (Hypertext Transfer Protocol) messages that efficiently tells the routine, tools, and protocols that are essential for developing a software application.
There are majorly two kinds of API available in the market. They are as follows:
• Simple Object Access Protocol (SOAP) – It deals with a formal programming language like Java and Microsoft.NET.
• Representational State Transfer (REST) – It is the famous protocol that is used to define the constraints and properties for the HTTP.
What is a RESTful API?
A RESTful API provides an independent client-server architecture for both the client and the server. It makes a call to a server from a client-side and you get the data back through the HTTP protocol.
It is also cacheable i.e the client has the control of storing the data on the cache. Here, the server is the back end of the service and the client is the front end component.
REST is the most popular and commonly-used style for designing and developing APIs. There is a lot of similarities between the working of a REST API and a website.
For example, when we type https://graph.facebook.com/youtube , what we get is the response to our request made to the API from our browser to the Facebook’s graph API.
The result which we get is some sort of JavaScript Object Notation formatted data. The screen you will see will look like the below image:
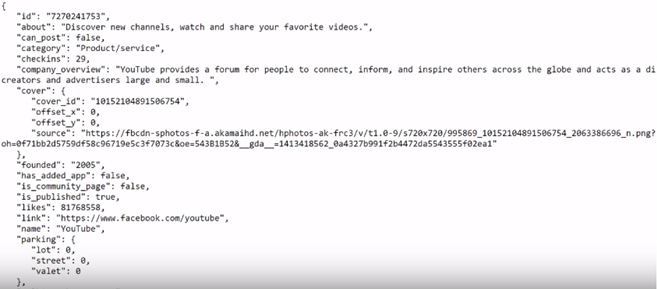
So, exactly why we use REST API more frequently and commonly?
There are multiple advantages of using REST, some of them are:
• It is simple to understand by the programmers and is more flexible.
• Smaller learning curve.
• No expensive tool is needed to communicate with the web server.
• Does not require an external processing, thus faster than other APIs.
Setting Up RESTful API for your Mobile App
In this section, we will guide you through about server hosting, designing backend architecture, security, selecting database and storage option, and creating compatibility with the multiple platforms. Let’s dive deep towards addressing each of these points for better understanding.
1. Securing and Protecting Your Data:
Data security has become the utmost priority in today’s time, where it is easy to breach into users personal data through hacking. There is a wide spectrum of the authentification approaches according to your requirement. The basic authentication technique that is using HTTP is not sufficient to secure your data. However, it is easy to implement.
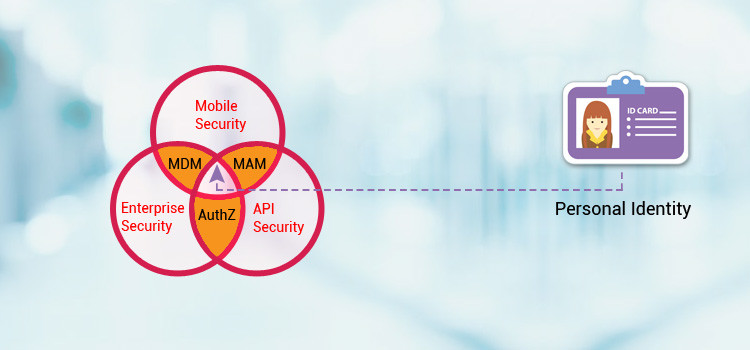
In order, to provide a highly secured environment which offers an end-to-end approach to providing a solution for enterprise as well as mobile devices. The center point of concern when we are dealing with data security is to protect a person’s identity.
Thus, for this reason, we use some kind of digital encoding to protect the data or we use OAuth 2.0. It is recommended to use OAuth 2.0, as it provides double-authentification.
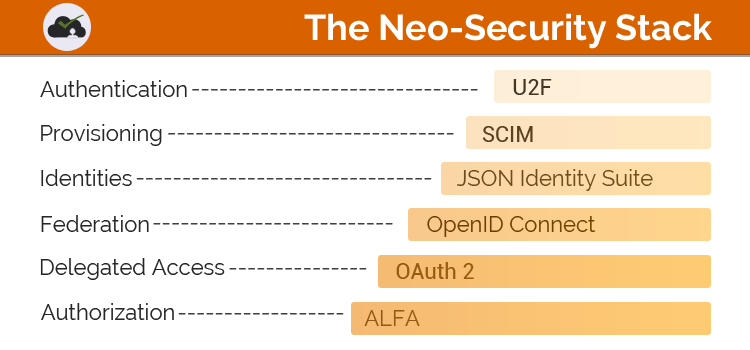
However, OAuth 2.0 cannot single-handed protect al data. Depending on the type of data you are trying to protect we have the Neo-Security Stack prepared for that purpose. The given below is the stack that describes the standard approach (ALFA) which is used to authenticate the data. With the help of these standards, we can create the secured APIs.
It is recommended to use the existing authentification techniques rather than developing in-house, as it will waste time and resources.
2. Hosting a Server:
Server hosting plays an important role, as based on the project requirement i.e. project scalability, performance, and administrative features, a server type is decided. Many mobile app development companies prefer to avail the cloud-hosted solutions which are easily available rather than hosting their own server.
There are many factors that play an important role in deciding where to host the server. Some are costing per increment to the GAge requirement, migration feature allowing you to have multiple environment presences, the security of your data and system, etc.
3. Strategizing the Architecture:
Architecture is developed in three phase; starting from the development, staging, and production.
Phase 1: Development
In this stage, developers, perform meticulous coding and testing in order to develop a user-friendly app. You can take this stage as the layout or backbone of the application. Data used for testing the app is generated by the developers with the help of the pre-generated scripts. The database is filled with the sufficient amount of data in order to run the test. If your code gets a successful approval from the QA, then it enters the next phase, i.e. Staging.
Phase 2: Staging
Here, the data is real-time data, that means, now you will import the data from the real-time. The good the quality of the data, the more reliable is your code. Thus, try to use the real data to run in this phase.
Phase 3: Production
Well, this phase needs to be free from bugs, loopholes and any kind or time delay in the system. If the system is not able to reproduce the same quantity of data then, it means you have to move down to the phase 1 to make changes in the code and fix the issues.
4. Compatibility with Various Platforms:
When we are considering developing the API, it means we are developing it not for just one single platform but for a wide range. API should be scalable enough to commodate the future changes too. Also, while making an API, preassume your users as naive as possible.
Thus, storing all the heavy sorting, data aggregating and consolidation on the server. This will make the logic for the client simpler. Creating API for the multiple platforms will help you as a developer to write the code once for all type of platforms including iOS, Android, and Web. For the future perspective, debugging and reading logs becomes easier with this approach.
5. Scaling Database:
The type of database you are using depends on the data. It might be possible that you implement the traditional version of the database like MySQL, or you would prefer a more scalable version of the database like MongoDB. Every database has its own advantages and is suitable to implement based on the data you are working on.
MySQL/MariaDB
• Stable, reliable and easy
• Less data mismatch because of well-structured data and rigid data.
• Domain-specific knowledge is required for scaling.
MongoDB
• It is easier to scale than MySQL database
• Easier to use
• No formal schema and no tables required
Different Tools to Test API
There are many tools that can be used to automate the testing process of a REST API. Some of them are mentioned below.
-
Postman:
This tool is easy-to-use REST client. The tool comes with a native version for both Windows and Mac apart from its quick plugin for Chrome users. Postman allows its user to send a request to the web server and server responses back quickly.
Apart from this, it permits the user to set up all the cookies and headers that the API is expecting, thus checking the response later.Features:
1. It is used in exploratory and automated testing.
2. Compatible with Windows, Linux, Mac and Chrome Apps.
3. Attributes like Run, Document, Test, and Monitoring.
4. Integration with Swagger and RAML is possible. -
REST-Assured:
It is an open-source Java DSL (Domain-specific language) that makes testing very efficient and easy. This tool supports JSON and XML request/response.
Feature:
1. Support BDD (Behavior-Driven-Development) Given/When/Then syntax.
2. Eliminates the requirement of boiler-plate code to interact with the REST services.
3. Easy integration with Java projects. -
REST Console:
It is an HTTP Request Visualizer and Constructor tool that support developers to develop, debug and test RESTful APIs.
Features:
1. Syntax Highlighting.
2. It supports all the major authentication approaches like OAuth 2.0, Basic, Plain, and Custom.
3. Easy creation of parameters.
How to implement RESTful APIs for Mobile Apps
Well, after knowing about the basic of the APIs, tools, and types of APIs, it is time to start coding with your first basic RESTful API for your mobile app.
Before you move ahead with the coding of API, it is important that you set up your app. For that, we need to first get our Node.js project started with the help of npm. npm allows you to install the JavaScript tools and modules of your project as it is a package manager for JS projects.
- Create a folder, direct it to the command line and run.
$ npm init
Choose default option for all the npm questions. After this step, npm will create a package.json file, this file keeps track on your project information. You can also install Express, which is a web framework for Node.js. For install Express, run this command:
$ npm install –save express
Now, here are the steps to create your first REST API-
Step 1: Create a file name “index.js”.
Step 2: To import the Express module, initialize the Express object, a manager for GET/notes which reverts back to the request with a JSON object. Also, initialize the port number where the express links to the HTTP. Say, for example, 3000.
Step 3: Now run the code on the command line:
node index.js
Well, you have created your first basic REST API. You can see the result of your request on http://localhost:”Port address”/notes.
Now you can check the API authentication and testing with the help of the tools.
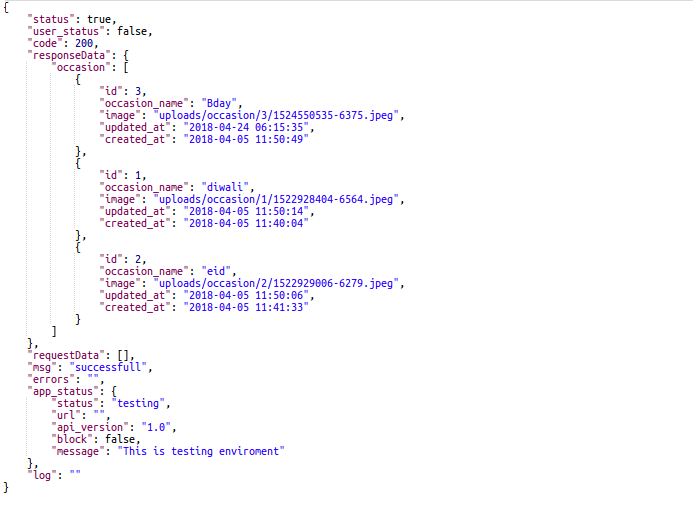
For a better understanding of how to code, please refer the below images.
Here, we request the API to give us the details of the occasions (Birthday, Festivals, Events, etc). API gives the response back by giving the details in the various formats like JSON, HTML, TEXT, XML, etc.
Request to the API can be made in the following manner:
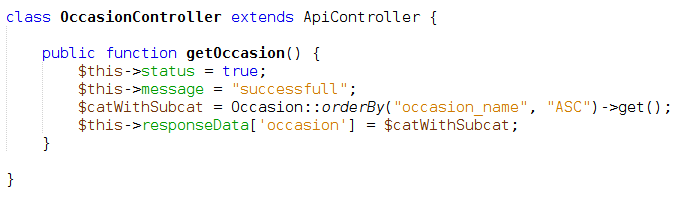
The Response which you will get will be like the JSON format given below:
Conclusion
Above we have tried to give you an insight to the API know-how. It is recommended that to become a top app developer, you should start with developing an easy API first, this will help you to understand the basics.
Also, when you are working on a backend project, try to communicate with the development team as much as possible. This will reduce the bugs at the endpoint and will surely eliminate any lagging in the implementation of the API.

My name is Hemendra Singh. I am Managing Director and co-founder of PuzzleInnovationz, a Mobile App Development Company. I am having a keen interest in the latest trends and technologies that are emerging in different domains. Being an entrepreneur in the field of IT sector, it becomes my responsibility to aid my audience with the knowledge of latest trends in the market.
Search By Keyword
Categories
![Oracle Database Advantages, Disadvantages and Features [Guide 2021]](../wp-content/uploads/2019/08/Oracle-Database-Advantages-Disadvantages-150x150.jpg)


SUBSCRIBE TO OUR BLOG